Before starting your application, please tap here to check the required documents and eligibility category for each child.

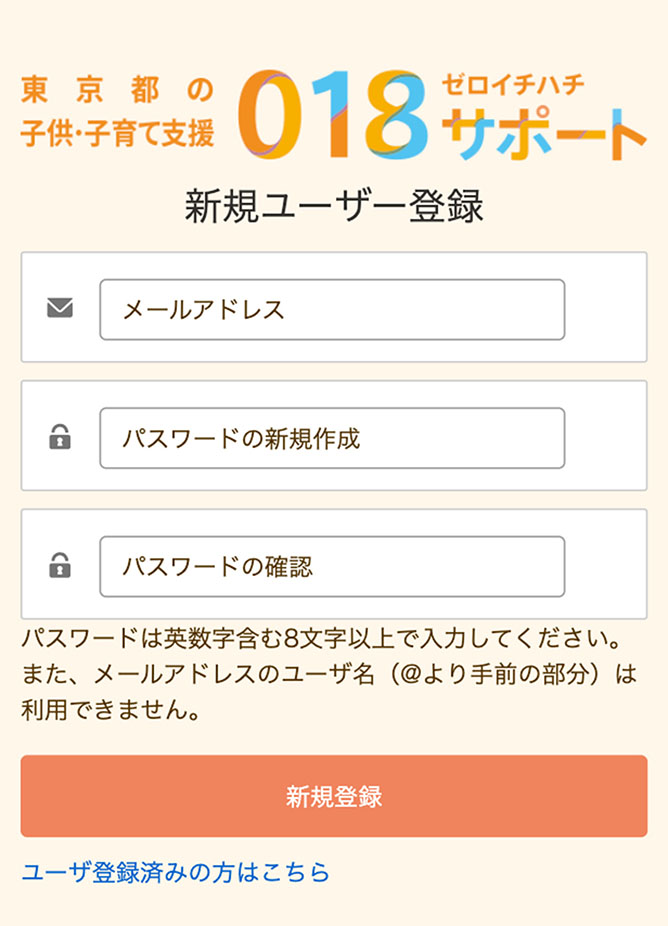
If you have not registered as a user yet, enter your email address and password (including confirmation) on the new user registration page, and tap the “Register(「新規登録」)” button.
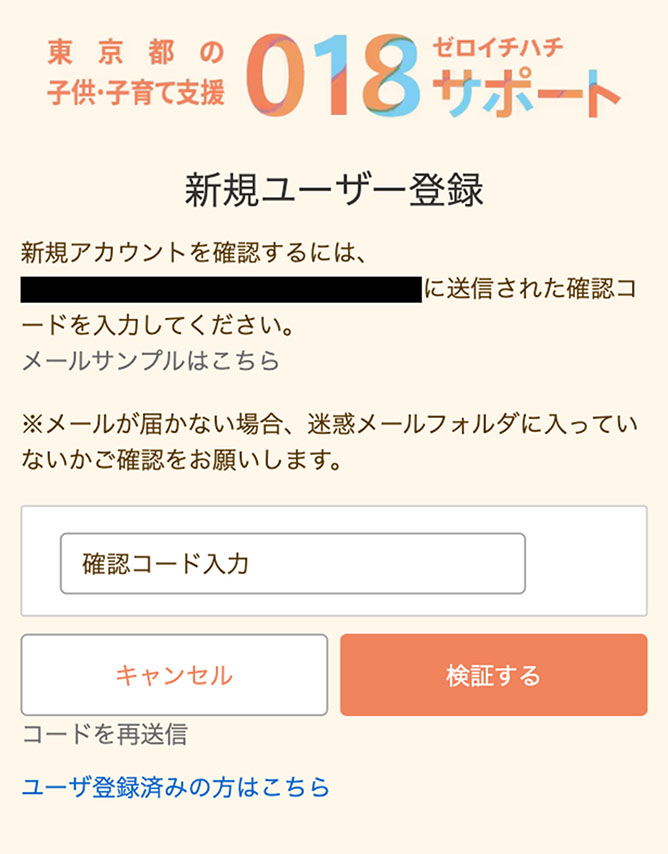
A confirmation code will be sent to the email address you provided. Enter it in the “Enter Confirmation Code(「確認コード入力」)” field and tap “Verify(「検証する」).”
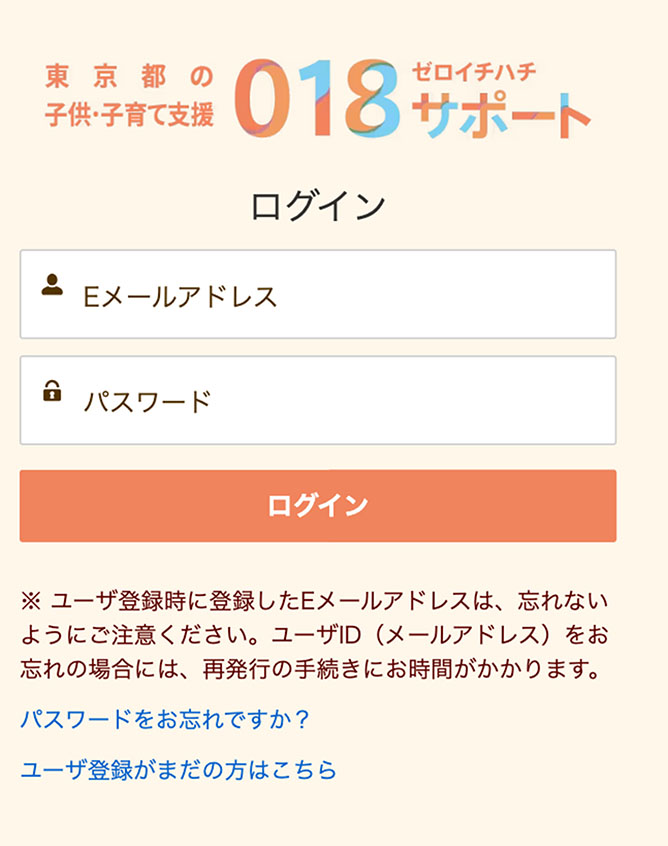
If the correct confirmation code is entered, you can access My Page.

To accesses My Page in the future, enter your email address and password in the respective “Email Address(「Eメールアドレス」)” and “Password(「パスワード」)” fields on the login page, and tap “Login(「ログイン」).”
After logging in to My Page, tap “Apply Here (「申請はこちらから」) ” displayed at the top of the screen to begin your application.

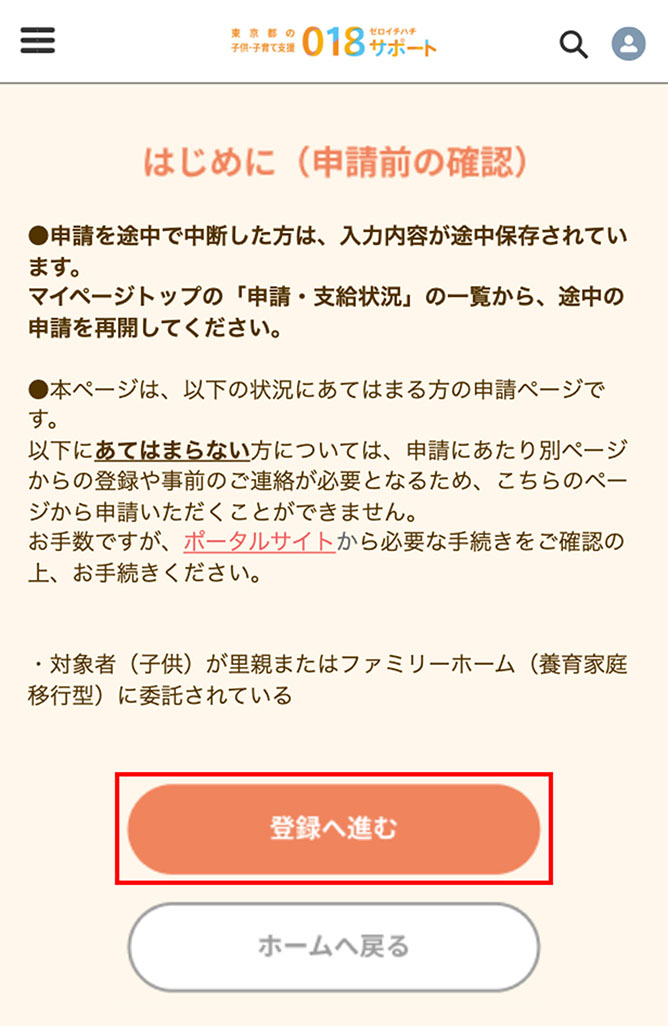
The screen will switch to “Initial Steps (Pre-Application Check) (「はじめに(申請前の確認)」).” After confirming the following information, tap “Proceed to Registration (「登録へ進む」).”
● This is the application page for those in the following situation.
For those not in the following situation, you cannot apply from this page because registration from a different page or contact beforehand is required to apply.
Please check the necessary procedures from the portal site and proceed accordingly.
・Cases where the eligible person (child) has been entrusted to foster parents or a family home (transition-type foster care )
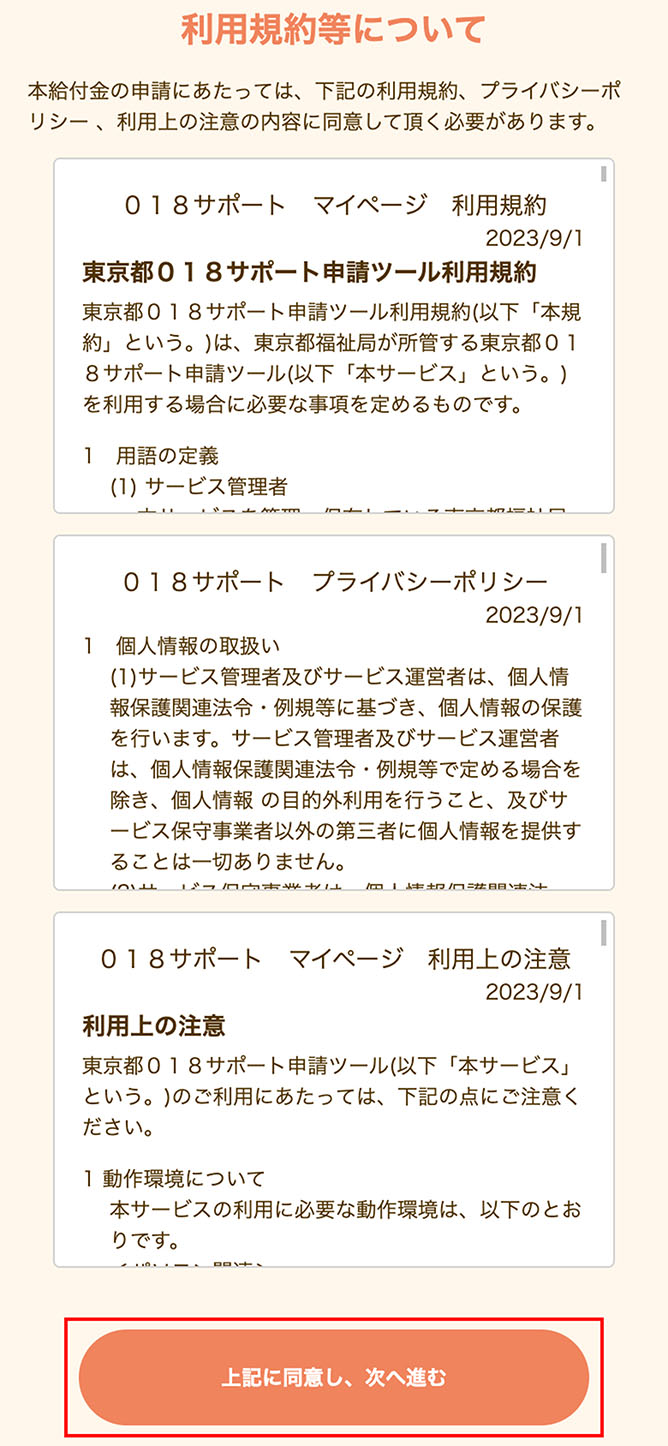
The “Terms of Use, etc. (「利用規約等について」)” screen will appear. Please confirm the content here and then tap “Agree and Proceed (「上記に同意し、次へ進む」)” to continue.
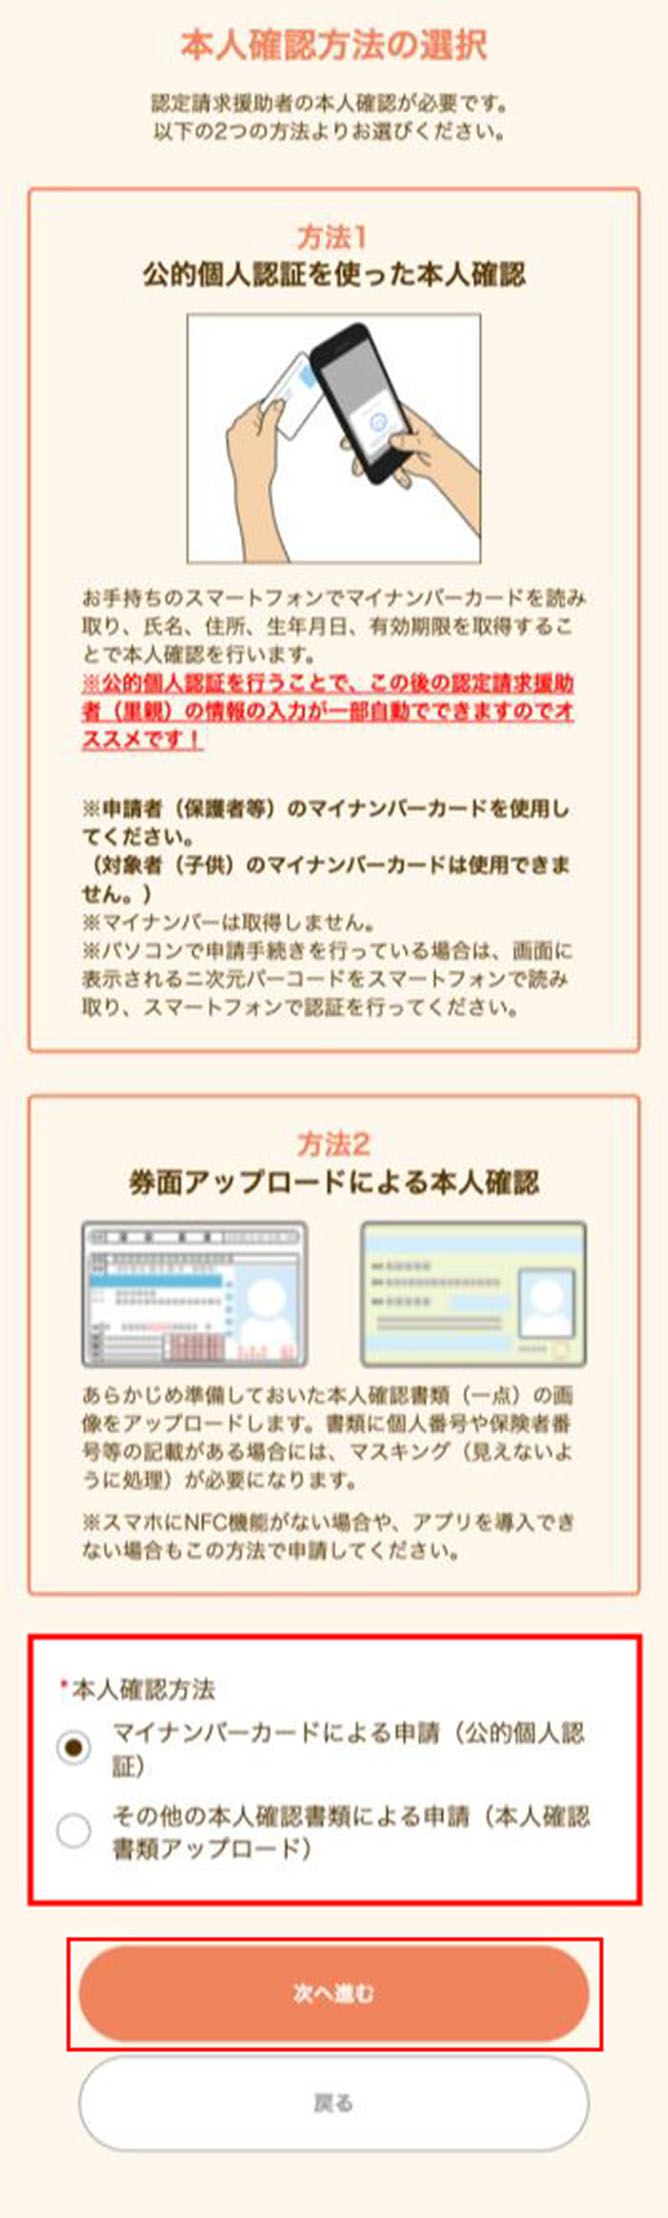
The “Select Identity Verification Method (「本人確認方法の選択」)” screen will appear. Select either “Apply with My Number card (public individuals certification) (「マイナンバーカードによる申請(公的個人認証)」)” or “Apply with other identity verification documents (upload identity verification documents) (「その他の本人確認書類による申請(本人確認書類アップロード) 」)” and tap “Proceed (「次へ進む」)” to continue.
Verify your identity by scanning your My Number card with your smartphone to obtain your name, address, date of birth, and expiration date.
*Individual public certification using My Number card can complete individual public certification at once, and entering your applicant information later can be partially automated, so this method is recommended.
*Your My Number will not be retained.
*If applying from a PC, use your smartphone to scan the two-dimensional barcode displayed on the screen and authenticate via your smartphone.
Upload images of two identity verification documents you have prepared in advance. If the documents contain individual numbers, insurer numbers, etc., you must mask them (making them unreadable).
*Please use this method if your smartphone does not have NFC capability or you cannot install the required app.
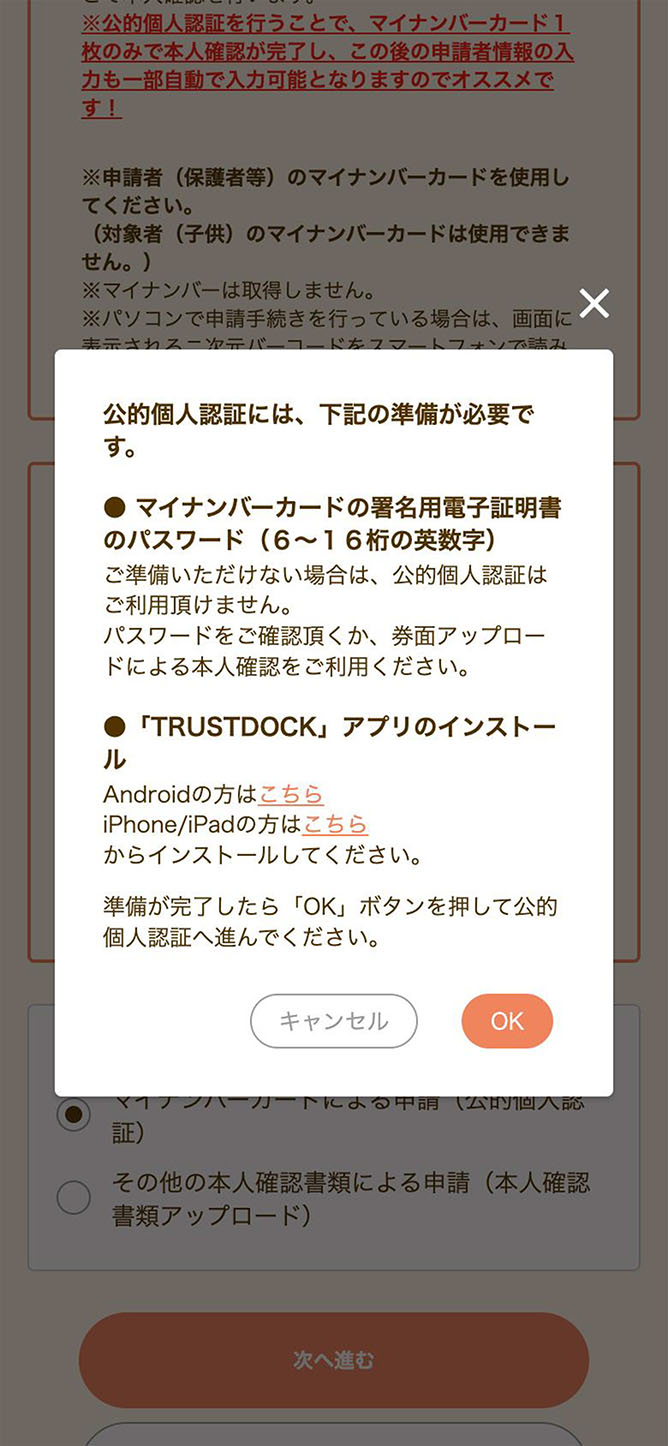
If you selected “Apply with My Number card (public certification for individuals) (「マイナンバーカードによる申請(公的個人認証)」),” the screen below will appear. Follow the on-screen prompts to proceed with the authentication process.
If you do not have this, you cannot use public certification for individuals.
Please confirm your password or use identity verification by uploading images of ID documents.
Android users: Install from here
iPhone/iPad users: Install from here
Once you are ready, tap the “OK” button to proceed to public certification for individuals.
If you selected “Apply with other identity verification documents (upload identity verification documents) (「その他の本人確認書類による申請(本人確認書類)アップロード」),” the following screen will appear. Select the documents you will submit from the dropdown menu and upload the images.
*If the document contains an individual number, insurer number, etc., you must mask them (making them unreadable). Mask them by covering the relevant parts with sticky notes or pieces of memo paper before photographing, or use a paint app to blot out the relevant parts on the photographed or scanned images.
*Only documents that are valid at the time of submission or within three months of the date of issue are acceptable.
*If there are additional notes on the back or elsewhere, upload images that show this information.
*Files that you can upload are restricted to the following:
File extensions: JPEG / JPG / PDF / PNG
Size limit per file: 5MB
*Uploading multiple copies of the same identity verification document will only count as one document.
*Uploading both sides of a document that has information on the front and reverse counts as one document. Please upload the images after confirming the above explanations.

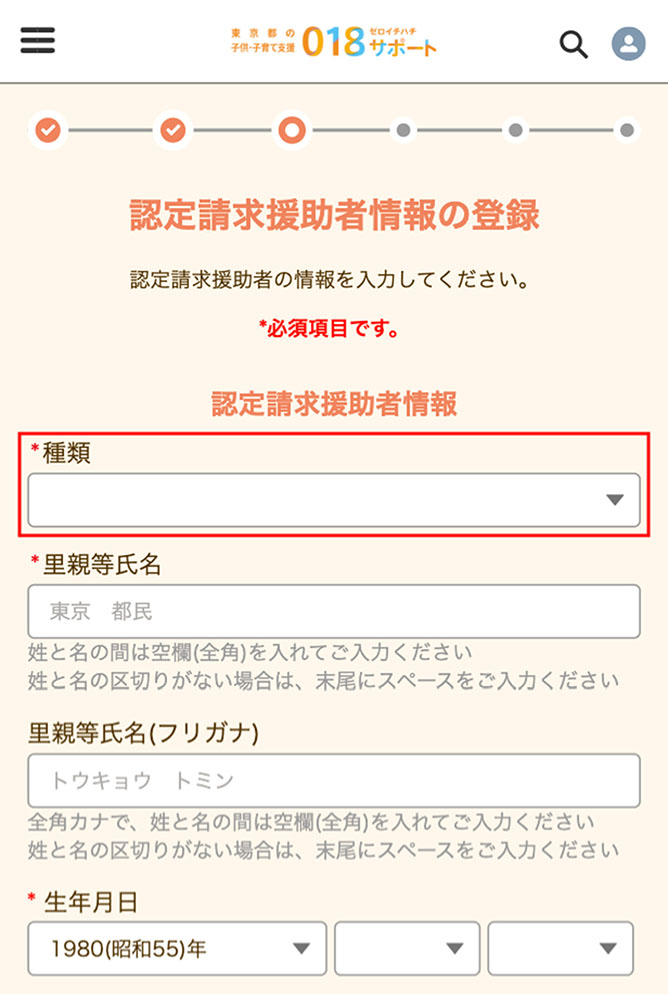
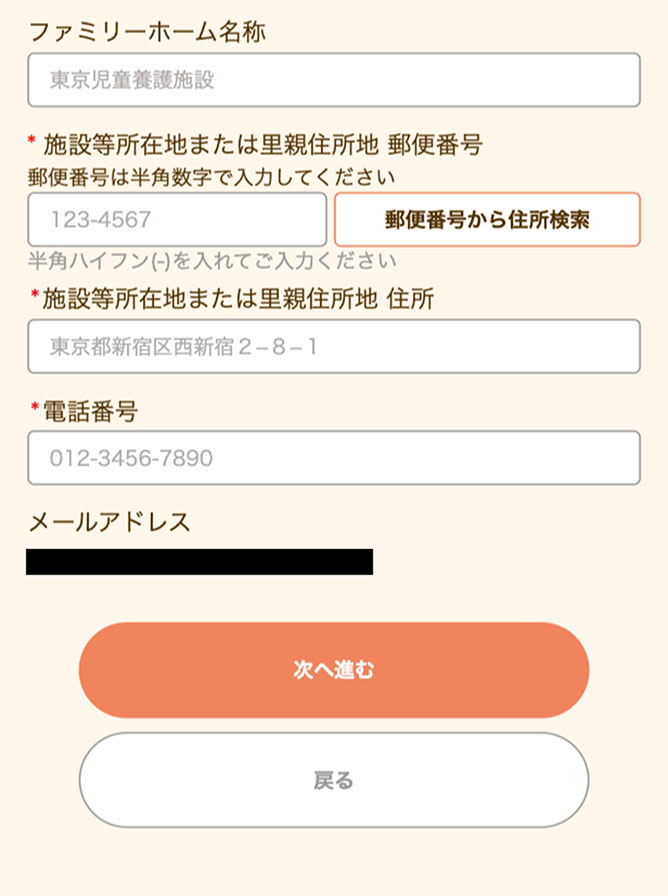
Once identity verification is complete, the following screen will appear. Select the applicable option from “Type (「種類」)” and enter the approval request assistant’s information.
*Insert a full-width space between family name and given name.
*If there is no separation between family name and given name, insert a space at the end.
*Enter in full-width katakana, with a full-width space between family name and given name.
*If there is no separation between family name and given name, insert a space at the end.
*Insert a half-width hyphen (-).
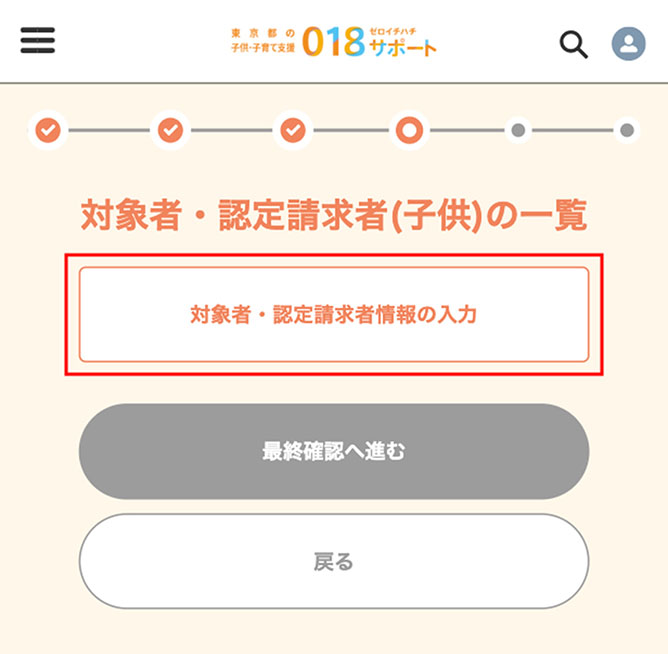
Once applicant information registration is complete, the following screen will appear. Tap “Enter Eligible Person Information (「対象者情報の入力」)” and register the eligible person’s (child’s) information.
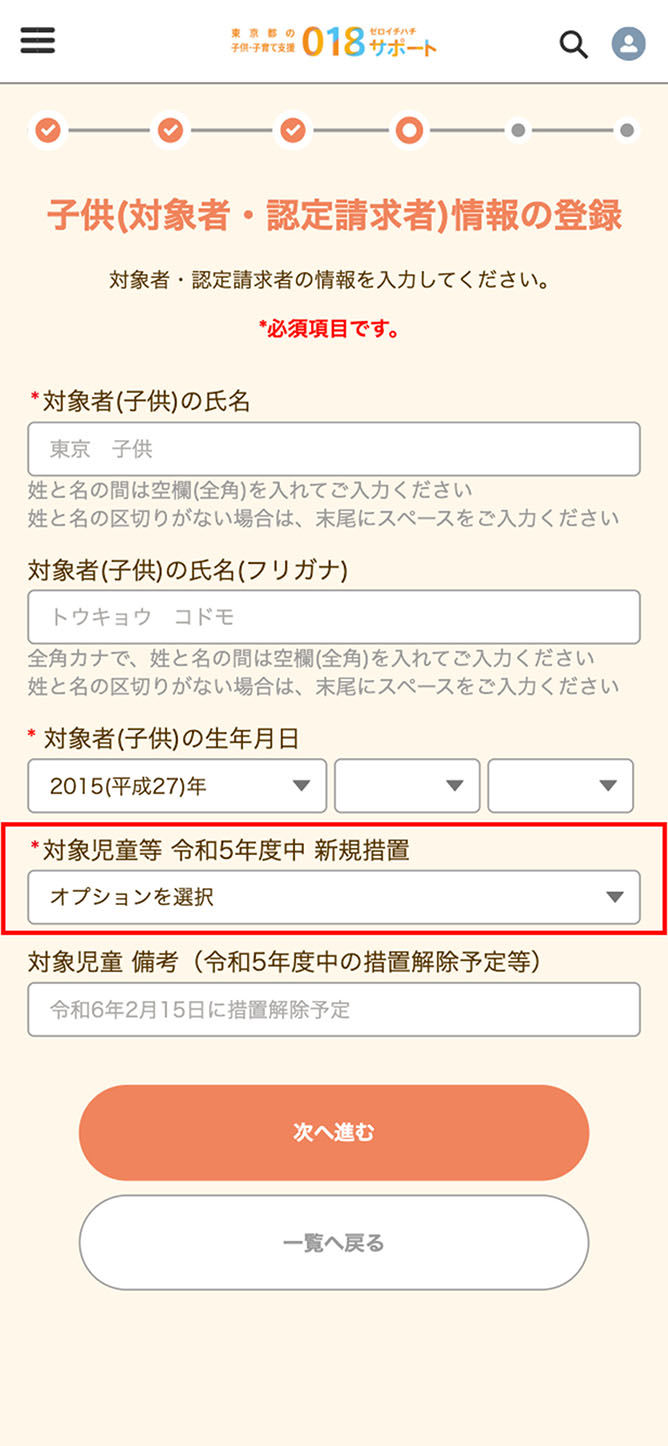
The following screen will appear. Enter each item following the on-screen prompts, same as when registering approval request assistant information.
Note that for “New Placement of Eligible Child, etc. in Fiscal 2023, (「対象児童等令和5年度中 新規措置」)” you must input either “Yes (「はい」)” or “No (「いいえ」).”
Once “Registering Eligible Person/Approval Requestor (Child) Information” is complete, the following screen will appear.
Upload an image of the “Notice of Placement Decision (「措置決定通知書」)” from “Upload File (「ファイルをアップロード」).”
Once uploads are complete, tap “Proceed (「次へ進む」)” to continue.
*Only files meeting the following criteria can be uploaded:
File extensions: JPEG / JPG / PDF / PNG
Size limit per file: 5MB
*Of the documents to submit, those marked with * are mandatory. Also, where family relationship verification documents are selectable, you must submit at least one.

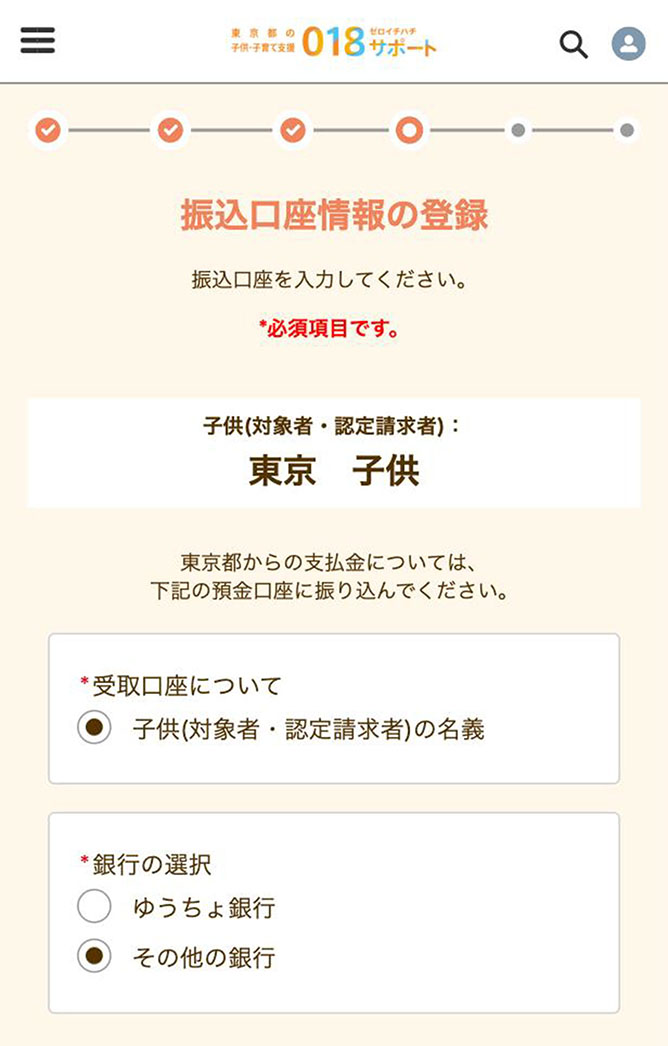
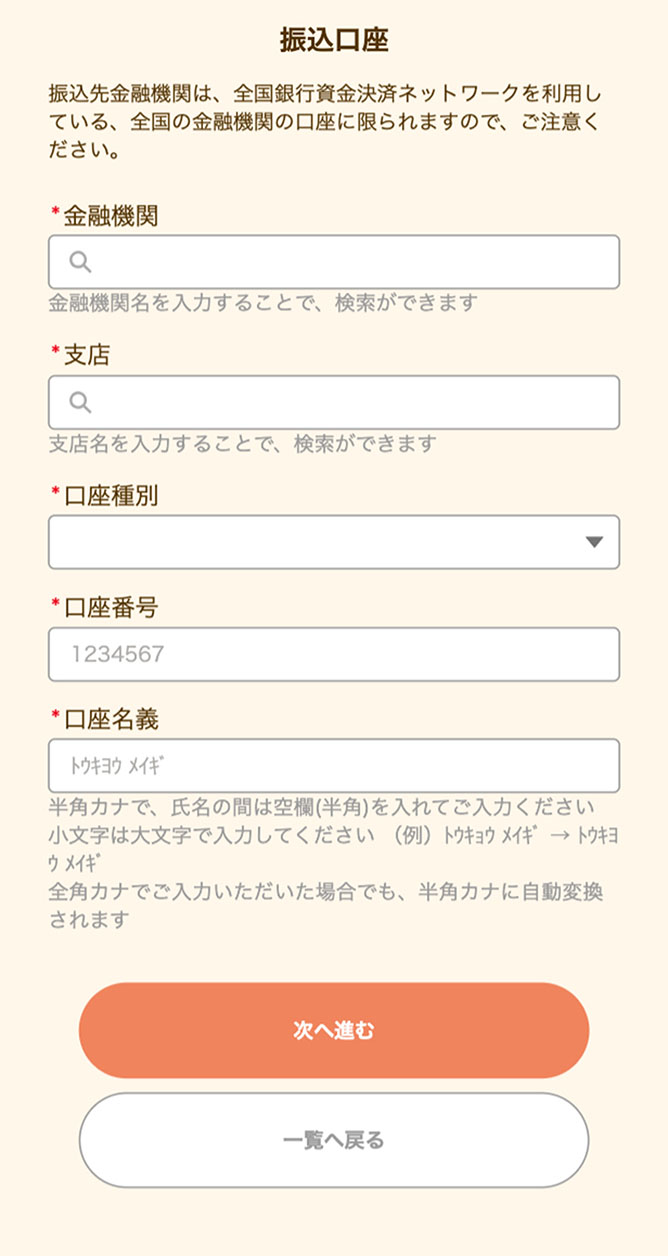
Next, the “Register Bank Account for Transfers (「振込口座情報の登録」)” screen will appear. Select “Child’s (Eligible Person/Approval Requestor’s) Name (「子供(対象者・認定請求者)の名義」)” for the receiving account, enter the account information, and upload documentation to verify the account for transfers.
*You can search by entering the name of your financial institution.
You can search by entering the branch name.
*Enter in half-width kana, with a half-width space between family name and given name.
*Enter small kana as full-size kana. (e.g., トウキョウメイギ→ トウキヨウメイギ)
*The benefit transfer destination account can be under the name of either the applicant or the eligible person (child). To request transfer to an account in the applicant’s name, fill in the transfer account section below.
*To designate an account under the eligible person’s (child’s) name, do not enter anything here and tap “Proceed (「次へ進む」)” to continue.
*If the application is by an eligible 18-year-old person himself or herself, enter the account details on this screen.
*If entering Japan Post Bank account details, enter the Japan Post Bank code and number. Do not enter the account number for transfers.
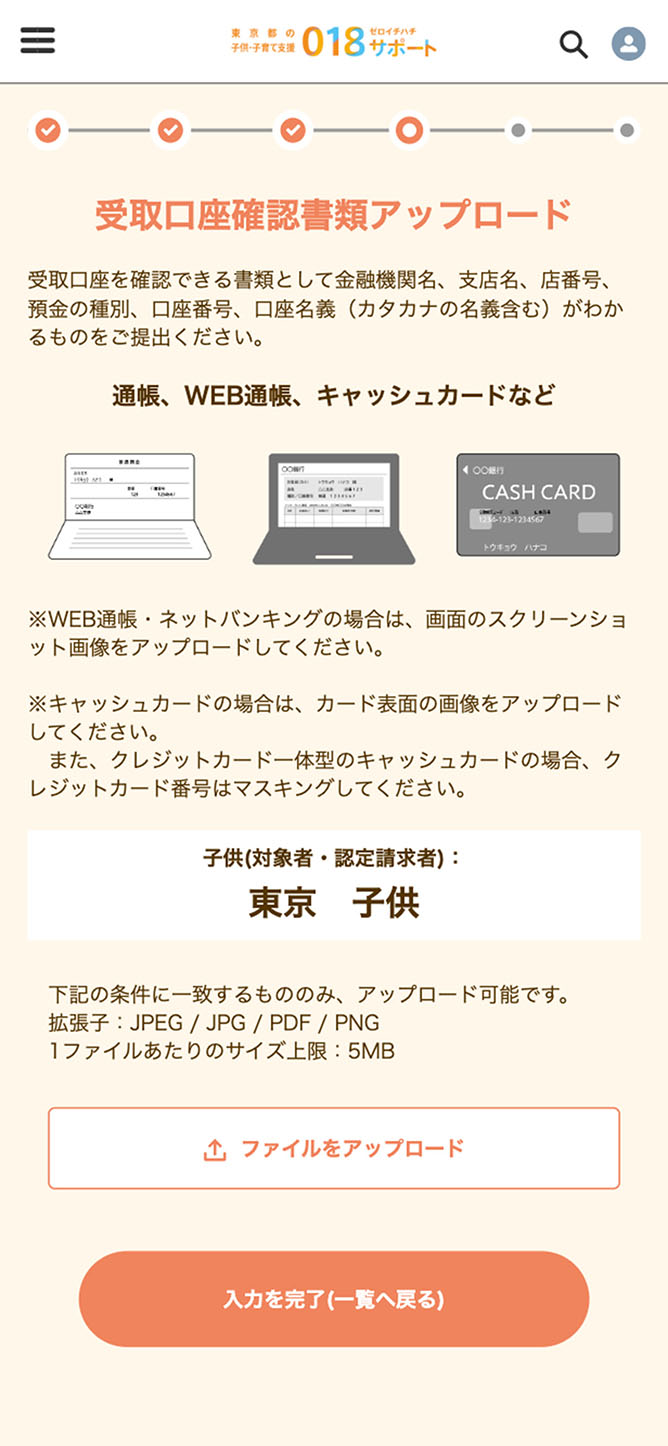
The “Upload Documentation to Verify Account for Transfers (「受取口座確認書類アップロード」)” screen will appear. Please upload documentation to verify the account for transfers. Once the upload is complete, tap “Complete Input (Return to List) (「入力を完了(一覧へ戻る)」).”
*Please submit documentation showing the financial institution name, branch name, branch number, account type, account number, and account name (including name in katakana) to confirm the receiving account.
*For online bankbooks or Internet banking, upload a screenshot of the screen.
*For ATM cards, upload an image of the card’s front. For ATM cards with integrated credit card functionality, mask the credit card number.
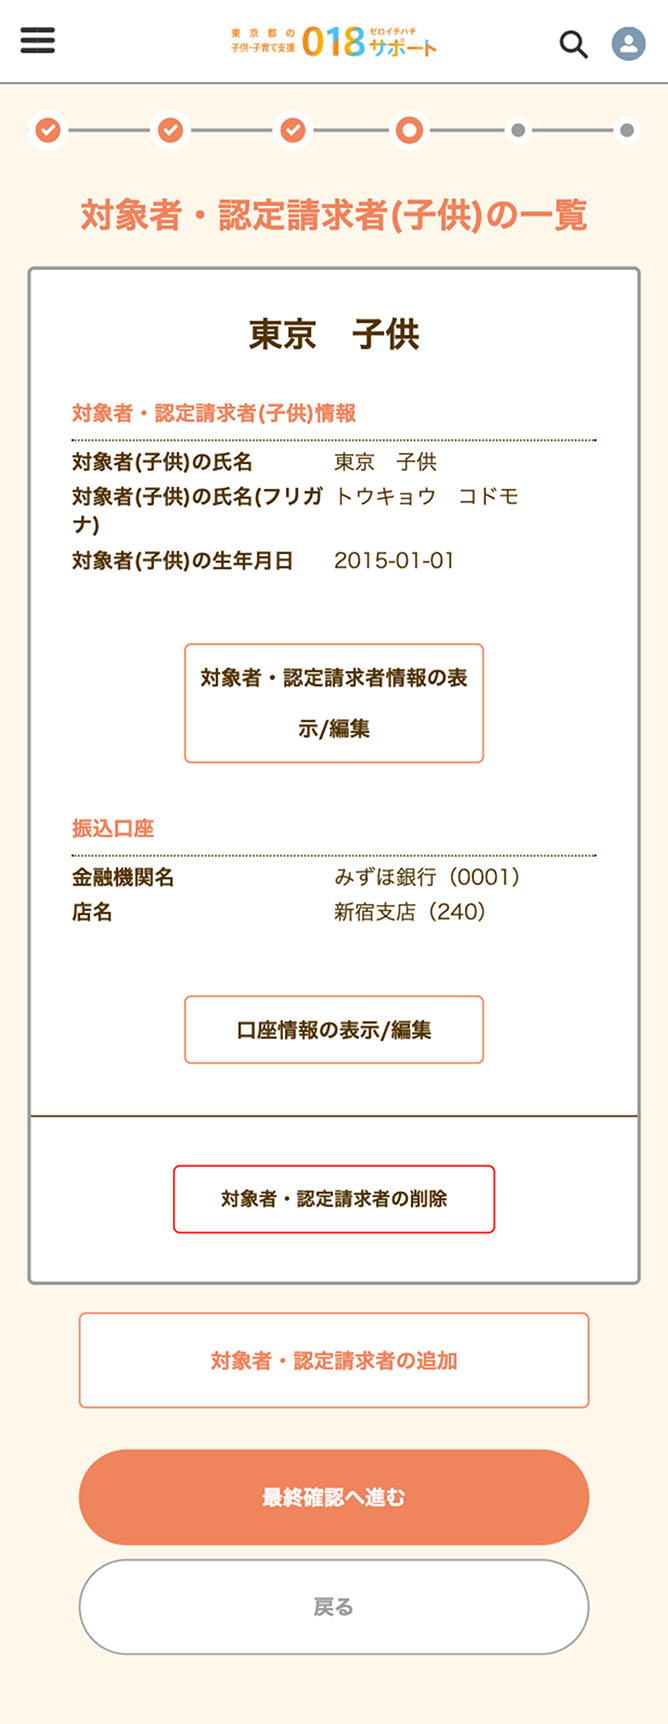
The “List of Eligible Persons/Approval Requestors (Children) (「対象者・認定請求者(子供)の一覧」)” screen will appear. Please confirm that the entered information for the child(ren) is reflected correctly. To check and revise information, tap “View/Edit (「表示/編集」)” for each item.
To register information for multiple children, tap “Add Eligible Person/Approval Requestor (「対象者・認定請求者の追加」)” to enable entry of second and subsequent persons.
Once eligible person (child) information registration is complete, tap “Proceed to Final Confirmation (「最終確認へ進む」).”
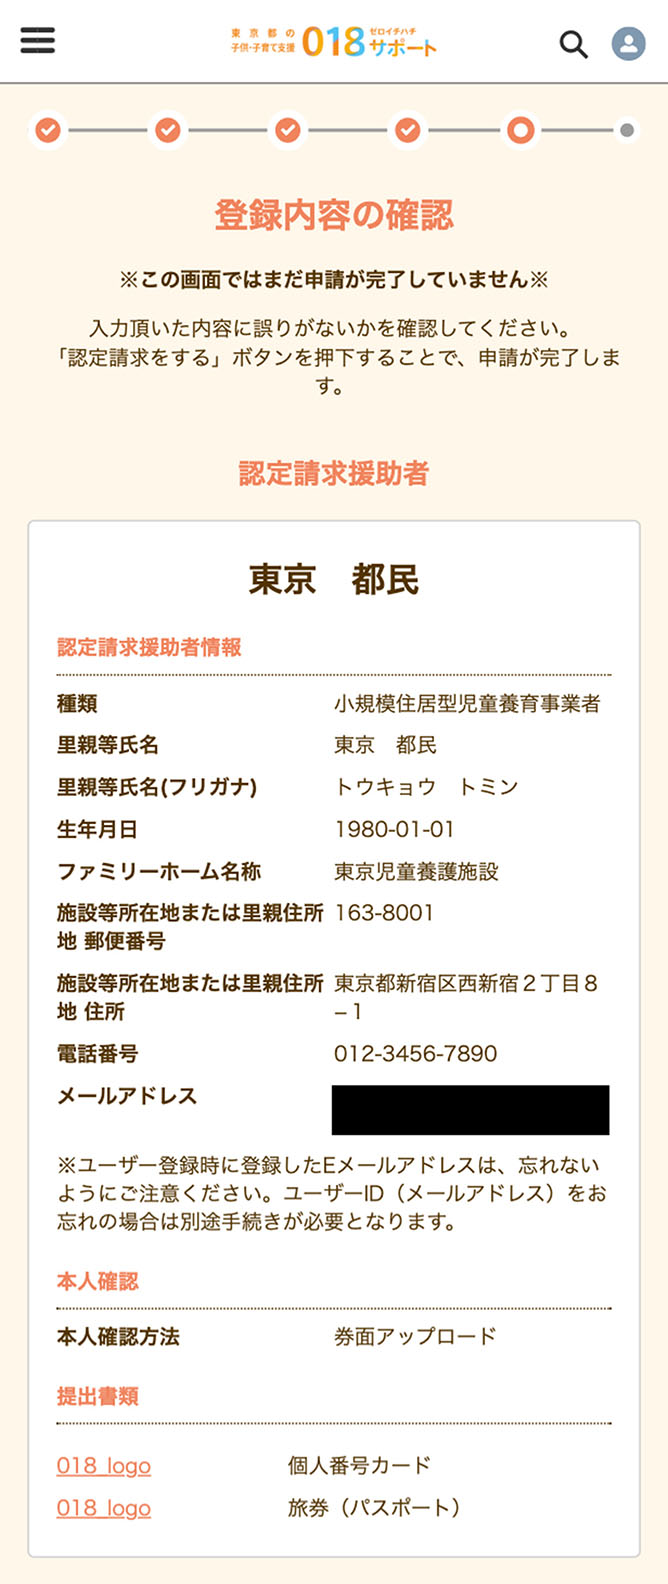
The “Confirm Registered Information (「登録内容の確認」)” screen will appear. Please check that there are no mistakes in the entered information.
If everything looks correct, tap “Make Approval Request (「認定請求をする」)” to display the next screen and complete the application.

Once the “Application Complete (「申請完了」)” screen appears, your application is finished.
An 8-digit approval request receipt number (「認定請求受付番号」) beginning with W will be displayed. Please keep this number for your records.
You can check application details on My Page under “Application and Payment Status (「申請・支給状況」).”
If there are any deficiencies in your application details, you will be notified on My Page. Please check the content and correct any deficiencies.
An application receipt email has been sent to your registered email address.
Please check it.

